Excel Publisher / Publisher Tab
External Data
Relates to the 'Reporting Layers', 'filters' etc as per your dataset/connector configuration in MAGIQ Performance.
Reporting Layers - dataset Layers that can be dragged into your report.
Filter - Filter data in your named range.
Right click menu options are:
Collapse Filter Tree collapse the filter tree if expanded.
Remove All Filter Locks remove the filters applied.
Exclude Filter exclude instead of include filter data.
Filter Selection Mode - Include or Exclude filter when selected
Conditions - Apply a condition to your named range.
Time Series - select the relevant time series for your range.
Dataset Fields - fields that can be dragged into your report.
System Variables - The following variables are available:
ActivePeriod – will display the period number in relation to the balance month, for example 1 for July if a June balance month.
PeriodName – will display the period name, for example, July.
Period2Name – if multi-dimensional time series is configured, this will display the 2nd dimension period name (usually year).
Period2Value – if multi-dimensional time series is configured, this will display the 2nd dimension period value (usually year id).
CurrentLayer – will display the layer’s name that is below the current layer selected on the navigation Tree e.g. if Department is clicked in the Navigation Tree, the next layer name, Activity, will be displayed.
CurrentSelectedLayer – will display the current layer’s name from the Navigation Tree window e.g. Department.
CurrentSelectedText - will display the current layer in the drill path
CurrentDrillPathText – this will display the Data Browser heading on the Excel report.
CurrentUserSecurityText – this will display the filter items that the current user is restricted to viewing.
Comments - select relevant comments to display in your report.
Functions - available options are:
Page Break – this can be attached to a multi-layered report. The function page break can only be dragged on to a layer.
SQL – this is where you can create user defined SQL to query data. Dragging this into a cell in Excel will bring up the SQL screen. In this screen you can put in any of your SQL you might like to use to enhance the report.
Named Ranges
Named ranges control how the data is going to display.
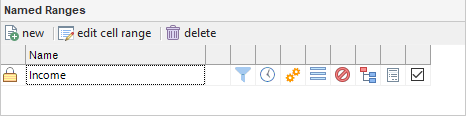
 New - create a new named range. Used for any additional ranges that you wish to create on the report.
 Edit cell range - make changes to the selected named range.
 Delete - delete the selected named cell range.
The icons in each column represent:
 indicates the range that is selected.
Name - displays the name of the range.
Range Group -
 filters are applied.
 a time series is applied.
 conditions are applied.
 auto resizing of rows can be done.
 hide zero records are applied.
 the navigation tree can be used to apply layers and filters.
 sub totals option has been selected.
 the range will be executed when published.
Right mouse click menu options
Right mouse click anywhere on the named range to display the right click menu:
Navigation navigation can be applied to the range.
Filters filters can be applied to the range.
Navigation & Filters this is set by default. Both navigation and filters can be applied to the range.
TimeSeries select your time series from 'PowerExcel Assigned Period', 'Active Period' or 'Use Computer Date'. By default, 'Active Period' is set.
Autoresize Rows When this function is applied to a range it will auto adjust the rows to the height and size of the text.
Note: This function will only work when wrap text is applied to the Range.
Display Sub Totals choose to display or hide sub totals when you have more than 1 layer in the range.
Hide Zero Records The default is 'No'. Options are:
No – all records are shown.
At All Layers – records with zeros in all columns will be hidden at all layers.
Only At Detail Layer – records with zeros in all columns will be hidden if they are in the last layer.
Execute Named Ranges choose from 'select all' or 'deselect all' as to which range will be published. This can speed up development time as you work on one Range at a time and you do not have to wait for all Ranges to execute.
Copy & Paste Named Ranges copy and paste the named range and make any relevant changes.
Identify name ranges
To verify that your named ranges display the correct information:
- Click the name range.
- Click somewhere in the spreadsheet.
- A green dotted line will display around the group of cells.