Budget / Data Entry
Note
Budget fields vs Data browser fields.
The data browser is designed for the user to add/remove fields depending on what the reporting requirements are.
Budgets are set/defined and therefore you are unable to add/remove fields.
The system enables you to capture information about your organisation and traditionally this data is related to building a budget or forecast.
However, your System Administrator can create columns within your Budget Entry window to allow you to capture both financial and non-financial data.
You can build your budget or forecast based on rules or formulas generated by your organisation.
And because the system updates immediately as you save your budget input, you can instantly analyse the results using the Navigation tree, Data Browser and Chart windows.
You can also monitor your budget's progress throughout the year.
Budget Entry
- With the relevant budget chosen.
- Navigate to the layer at which your organisation prepares the budget.
-
Select a cost centre to display the line items or income/expenditure accounts of the cost centre, for example:

In the example provided, the first two columns ('2018/19 Full Year Budget' and '2018/19 YTD Actuals Budget') relate to current year budgets and actuals, providing you with up-to-date information on the performance of the line item. These columns are locked for information purposes only.
The remaining columns in the Budget Entry window relate to Forecast and/or Next Year Budget and are available for you to input your data.
-
Select a cell in the Forecast or Next Year Budget column (2019/20 July Budget) and enter the required figure.
Amounts keyed into the 'Total Budget' column (2019/20 Total Budget) will be automatically phased across the Monthly Budget columns according to the value selected in the 'Budget Phasing' column.
Alternatively, phasing variations can be keyed into the Monthly Budget columns and will be reflected in the total.
For example, if an extra $1,000 is keyed into July this will be reflected in the total.
Therefore, should you wish to key amounts directly into the monthly budget columns, the total in the Next Year Budget column is maintained.
Widget icon
 Save the budget.
 Configure the budget entry screen.

 Refresh the budget entry.
Right click menu options
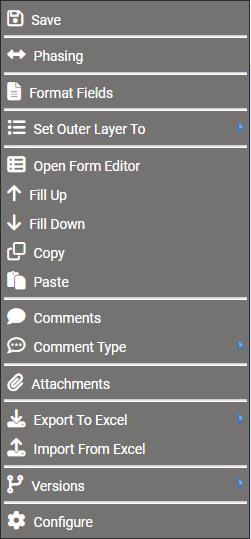
Save - Save the budget.
Phasing - Budget Phasing is a way of distributing your budget across the months of the budget year in accordance with how you see the item is to be expended or received.
Budget Phasing takes place as a result of you applying a figure to the selected line item in the Next Year Budget column.
The System Administrator may have already applied the appropriate Budget Phasing formula to each line item.
- A pop-up window will display the alternative phasing options.
- Click and drag your choice onto the cell in the Next Year Budget column of your selected line item.
-
You will notice the cell that you wish to apply the phasing to will have a green border.
Alternatively,
-
If your System Administrator has set up a column called 'Budget Phasing', you can change the phasing by selecting the relevant phasing option in the drop down menu.
Format Fields - Refer to data browser fields.
Copy - Copy the cell value.
Paste - Paste the copied value into another cell. Ensure the cell is in "edit mode" before pasting.
Open Form Editor - Displays a data entry form. Requires enabling via Budget Settings
Fill Up - displays if right clicking on the last row. Copy data up the column.
Fill Down - shows if right clicking on top row. Copy data down the column.
Fill Up and Fill Down - both options will display if selecting a row between top and bottom.
Set Outer Layer To - You can classify your Budget Entry window data using any of the layers available in your dataset.
Comments - Add a comment to the layer/cost centre.
Ensure that 'Show Comments' is ticked in 'Configure'.
A ![]() indicates that a comment has been entered. Refer to data browser comments for further information.
indicates that a comment has been entered. Refer to data browser comments for further information.
Comment Type - Select the type of comment that will be entered, for example 'Budget Commentary' or 'Variance Explanation'.
Attachments - Add any supporting documentation to the account.
Ensure 'Show Attachments' is ticked in 'Configure'.
A ![]() indicates that an attachment exists. Refer to data browser attachments for further information.
indicates that an attachment exists. Refer to data browser attachments for further information.
Worksheets - Display a list of worksheets depending on what your System Administrator has set up. Refer to Budget Worksheets for further information.
Transactions - Displays transactions, generally, at the lowest level. Refer to data browser transactions for further information.
Send to Excel - Exports the budget to excel.
Configure
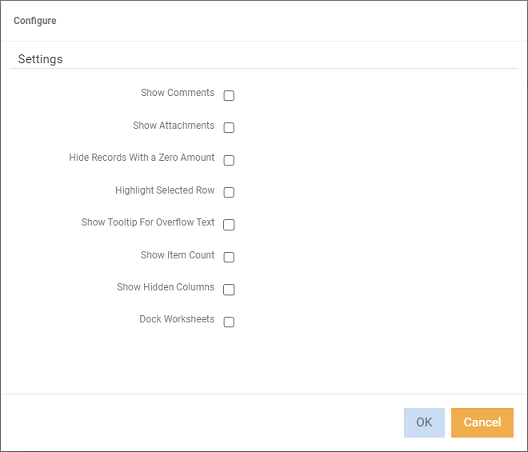
Show Comments - Displays a ![]() to indicate that comments are entered.
to indicate that comments are entered.
Show Attachments - Displays a ![]() to indicate that an attachment exists.
to indicate that an attachment exists.
Hide Records with a Zero Amount - Tick to hide any rows that have zeros in every column.
Highlight Selection Row - Entire row is highlighted and a border is placed around it. The selected cell will have a blue border.
Show Tooltip For Overflow Text - Displays a tooltip for overflow text. For example, a budget comment.
Show Item Count - Display the number of rows available.
Show hidden columns - Display columns that have been marked as hidden in control centre.
Dock Worksheets - Worksheets display under budget entry.